Posted in 50's House in the Woods, Remodeling Projects

This 50’s House is Growing UP!

Happy mid-summer to all of you out there; I hope you’re surviving & thriving in spite of the heat wave we all seem to be experiencing this season! I know our construction workers on this project have persisted through days and days of 102-109 heat – mostly on the roof! When we had a “cold front”, with temps only 97-99, we all felt great relief! Fortunately, this lovely 50’s house is surrounded by huge oak trees, so there is always shade…somewhere!

Today I’m going to show you pictures of the progression over the last 2 weeks; we are just about finished with construction on this project, so I’ll try to show how it all went back together, though I’ll show you more of the interior framing/finishing next time. What I’ve shown up to now has been mostly the DE-construction of the existing structure; once the decision was made to remove and reframe the roof of this house, the project changed from ‘remodeling’ to ‘new construction’…though we of course kept the original foundation and exterior brick walls (mostly). In the next few weeks, the house will be treated to all new plumbing, wiring and HVAC. Then new sheetrock, trim, cabinets, appliances etc: today is about the groundwork for the finish-out which begins soon!

First, here’s a look at the house as the roof was removed (a long, hot, difficult process to put it mildly). It took a long week with a large crew to remove first the shingles, then the tar paper, then all the decking and joists, then finally all of the old insulation. The old insulation was not doing much good, judging by the look of it, but it was VERY difficult and messy to be rid of; we are very grateful to the crew that took on that task, without complaint.

They had to just keep cutting, over & over!
Roofless house!

After the roof was completely off, along with ALL old insulation (and a whole construction dumpster had been filled) the framing crews arrived, ready to put in floor joists and plywood to begin framing the new addition. However, we realized we had not left under-the-house access to the new addition! There was an access between old and new sufficient to put plumbing pipes through, but not enough for a future plumber to crawl through for repairs. So….the foundation guys came back and not only enlarged the existing access between the new and old, but cut a new access into the brand new foundation to the addition. We have a nice new access vent/door to install when the time is right.

Future access under the house
“Things I didn’t know could be done”

Next the framers showed up to begin framing the addition; this was exciting to watch! For walls and floors to take shape after living “in my head” for months was just too satisfying – here are a few pictures for you:

Watching the new roof emerge was GREAT! After such a ridiculously low pitch, this 50’s house now has a higher pitch, great angles and transitions, and will eventually wear beautiful bronze metal for the cost-effective, energy-efficient and beautiful finish!

Just one of many new heavy roof members going up

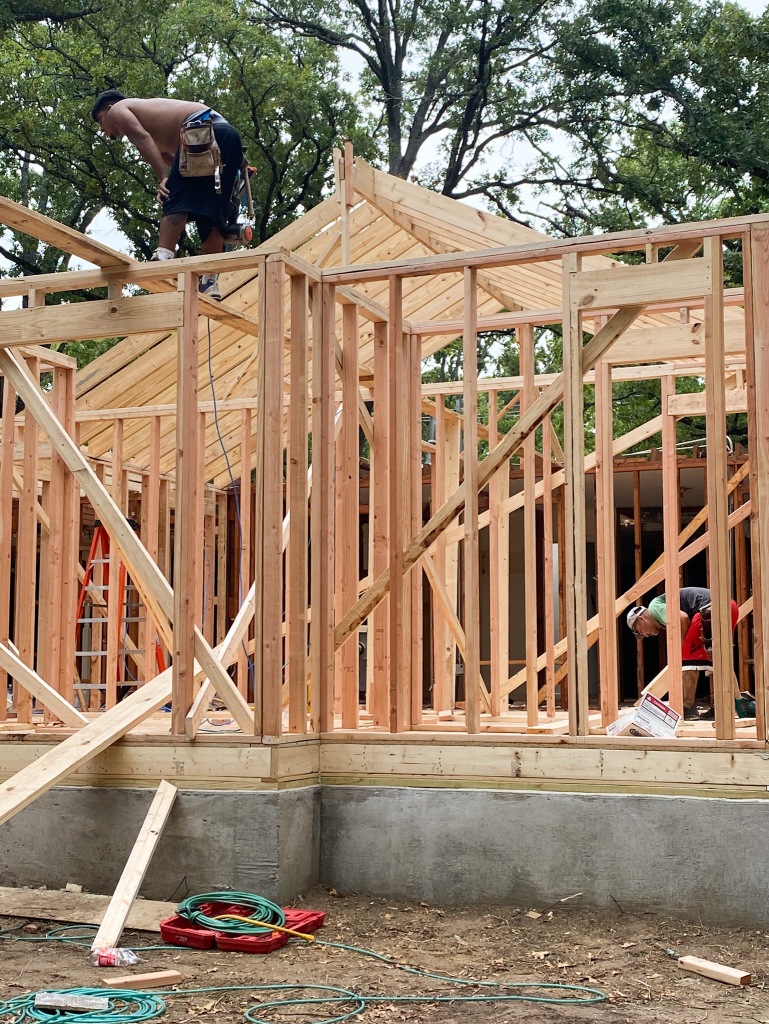
Once the structure was framed, they quickly added house wrap, the Tyvek seen in the photo above. Then a crew came in to add the cornice all around the perimeter at the top of the walls. The cornice gives a place to stop the roof decking and eventually forms the soffits. It has been interesting to watch various crews come in and out, as they are all specialized now. One does framing, another does cornices, another decks the roof, yet another attaches siding, and the last crew this past week put roof felt on to finally get it “in the dry”….and guess what? It rained that evening! 24 hours earlier and all the new framing wood and floors would have been drenched.

The roof, fully “in the dry” before the rainstorm!

The framing crew moved inside to begin redoing the walls I wanted moved; as you’ll later see, I wanted many areas “lined up” that had not been before. The finish-out of this process will not only be a major design element in the home, but will be one of those intangible (to most) features that create comfort and harmony for those living in or visiting there.

The first and most major move required bracing the existing kitchen and living areas so that the supporting wall could be removed. This is no task for amateurs, as the entire house structure is at risk when you remove a supporting wall! With proper bracing in place, they removed the wall; then it was time to replace that support to give the open concept we’ve all come to expect. I don’t always believe “open” is best, but in this case it definitely is. For one of the many reasons, now a person puttering in the kitchen will be able to look out the large picture window to the street as well as the new sunroom windows to the back, and interact with anyone wining/dining/or playing games in the surrounding rooms. Take a look at the new beam (we used an LVL, a laminated beam, but a steel beam may be used as well)

Those of you looking closely may have noticed that many of these photos include new windows! First of all, our windows came in weeks ahead of schedule, which was a nice touch of serendipity! We were prepared to keep the wrap on the window cutouts for at least a month, but instead we have most of them installed already! The windows were handled and installed by the wonderful people at Pane Window & Doors, a local family-owned company. We are using the prairie design of muntins/mullions in a soft beige shade; they will look wonderful with the gray-green shade of exterior paint, cedar accents and bronze metal roof!

Now you can see we’ve been busy at the 50’s House in the Woods, right?! It has been an exciting time; this week they’ll finish up the interior framing and begin adding new subflooring and plywood where needed. We will take a pause to get Keith with Keith Farr Limited in to measure for all cabinetry, now that the rooms are defined. We will also have the flooring guys in to measure for finished flooring, though we won’t need it for a bit. These days you order things as early as possible, as we are not quite past the supply chain issues that have plagued construction since Covid first hit.

Speaking of ordering, we will begin putting together orders for tile in the bathrooms and kitchen backsplash, lighting fixtures and other finish materials; plumbing supplies were ordered long ago at Apex Supply, so they are ready to be delivered whenever we’re ready (not yet!)

In the next couple of weeks plumbers will be in to re-pipe the entire house, including the sewer line. Because this house is pier and beam construction, we are free to move plumbing at will (and they’ll be glad for the extra-large access areas we created!) The electricians will also be in to rewire everything, as the 50’s wiring was badly out of date, and not grounded. HVAC guys will start new ductwork and add vents for the new high-efficiency unit; we have requested return air vents in every room, so it will be interesting to see how this plays out.

Please feel free to add comments or ask any questions about this project or products used; I will be naming many of the finishing products as we go, but I am always open to comments from my readers! Stay cool, enjoy the rest of your summer, and please check back often for updates! Thanks for spending a few minutes catching up on our project!

Posted in Empty Nester's Full Home Refresh, Interior Design Interest

CJ Pierce, Rock Star Electrician!

CJ Pierce, Drowning Pool

It’s not just EVERY job that has an international rock star show up to do the wiring, but that’s what happened at the Empty Nester’s Update project! The electrician we hired was super tied up with other work, so he sent a friend to help out in the meantime…enter CJ Pierce! After the first day his rock star ELECTRICAL skills convinced us to keep him for the whole job, and that was a great decision.

Now, I knew CJ was a rocker, but at the end of the first day he had worked alongside the plumbers doing rough-in; one of the plumbers asked if I KNEW just how famous he was?! He had recognized CJ and wanted me to know who he really was…so he filled me in. I went home and Googled CJ Pierce immediately, and wow, was I impressed!

CJ is one of the 3 founding members of the Dallas-based band Drowning Pool – and they clearly have quite a loyal following! In fact, CJ had to leave for 10 days (during other messy work at the house) to go on a USO tour overseas to entertain the troops! Besides clearly being “somebody”, CJ has been a real pleasure to work with: his calm demeanor when I asked him to do some magic to get wires where most would have said “can’t be done”, his professionalism and his cheerful outlook on life make the rigors of remodeling so much more pleasant!

CJ moving the dining room fixture over a few inches
Early work in the master bath

That grin, when Nancy says “CJ can I take your picture…again?!” What a good sport. So, he goes on tour with the band, makes albums, does gigs….all the usual rock star activities…but in between times, he takes on projects like ours, having been a licensed electrician for years and years. I can tell he likes his work, and he’s very good at it. There were at least 2 things I asked of him on this project that I don’t think most electricians would have attempted; his out-of-the-box thinking made them happen! Both involve wiring for hard-wired motorized shades on exterior walls…done!

This is a cool demo of how CJ marked the spots for new recessed lighting on the ceiling of the living room; we had removed dated brass track lighting, but given a large empty room, how do you decide where to place the lights, and keep them in line?? Well, as you can see he used a laser tool to layout the grid on the floor, then project it to the ceiling. One of those moments when you just have to love technology, huh?!

I’m so glad we’ve had this rocker/busy father/electrician to help us with this fun transformation; next week he will be hanging some of the coolest light fixtures in the house, as we begin the final finishing phase! Wood floors are going in right now, and tile work is continuing. The tile floors are finished, and they just installed the all-important shower pan in the master walk-in shower. Tomorrow the shower tile begins – I’m so excited to see it finished! I’ll leave you with a sneak peek of some of the lighting fixtures we’ll be hanging next week!

Fun fixtures, huh? They are going to be absolutely gorgeous as the finishing touches on these rooms – I always call light fixtures the “jewelry” of the home. This home will be decked out with just the right “jewelry” in each room, and I’m so excited to share the finished look! The painting is complete, gorgeous cabinetry is in, and wood floors are going in now: next week we will have quartz countertops, then lighting and plumbing fixtures. Soon I’ll be able to start showing you some semi-finished rooms, with all the finishes showing. Until then, have a great week and stay cool!

Posted in 50's House in the Woods, Demo!

Deconstruction 201

Just a quick update for you this week, on the 50’s House in the Woods project! This coming week we finally get to start putting things back together, as the framing crew redraws the lines of the whole structure: first they’ll frame the outline of the new addition, then completely reframe the roof over the “old” part of the house, the new wing and the patio. I can hardly wait to see how they tie the roofs together!

Since I’m NOT going up on the roof to show you how it looks while being deconstructed, here is an idea of the back (from the ground!) with only about 75% of the rafters remaining. The guys basically peeled the roof like an onion, one layer at a time. After all the shingles and tar paper, they had to remove decking boards one by one; when this house was built, decking was not 4 x 8 sheets of OSB, but single boards. They literally had their work cut out for them this past week!

Question: how do you make it rain in Texas in July???

Answer: start removing the roof decking on a house!

Yes, the day before work on the decking was to begin, the forecast showing a solid 2 weeks of 102-105 degree weather. I quipped, “Just watch, as soon as we remove the decking it’ll rain!” Haha, but never did I think it really would! Sure enough, the next morning when I walked out to open up the job site, it was dark and cloudy – and, within 30 minutes, it was pouring rain! We scrambled to get tarps up there and to cover what was below, but we just weren’t prepared. Since it was ‘supposed’ to rain again that afternoon, I went out and bought heavy-duty roof tarps so we could properly cover the next time. Do you think it rained that afternoon??? Nope!

Just now I was walking the site with the AC guy, discussing pros and cons of keeping the old ductwork or starting over, when I was struck by how interesting the house looked with only rafters overhead…the whole house is a loggia! Here, see what you think:

Someone asked this past week why we didn’t just tear the house down and build a new one; you may be wondering as well, since you cannot really “see” the house and the site. First, deconstruction is very expensive; well-built older homes do not fall apart easily. Well-built older homes are also, well, just that: WELL BUILT! This home was custom built in the late 1950’s, one of the best eras in modern America for home construction. While we are taking advantage of modern technological advances by replacing all windows and doors, using energy-efficient appliances and systems, and insulating throughout with foam, the structure itself, and the foundation it was built on, are very sound. In an area of East Texas where slab-built homes regularly settle and foundations crack, this 1950’s pier & beam foundation is solid and the floors are level. By taking advantage of quality construction, adding new energy-efficient features, and imbuing it all with a bit of modern style, we are creating a beautiful, sound home that will last for many more years. Perhaps the BEST part is the serene park-like setting this home sits on, surrounded by numerous mature oak trees not only in this yard, but the entire neighborhood.

This past week, two trucks brought building materials for the construction ahead; this being a small neighborhood with a narrow street ending in a culdesac , large-truck deliveries can be interesting, to say the least! Between the sagging overhead powerlines, narrow lane, and bicycle-darting kids across the street, I was just a tad stressed getting this all done! My stress, though, was nothing compared to the fantastic driver, who had to figure out how he could get close enough in his big rig to shuttle all the materials to the back yard, navigating through a maze of oaks the whole way! After weighing all the options, he decided to “straddle the drainage ditch”, which I admit I didn’t understand, until he actually did it: take a look!

Straddling the ditch!

Next week I’ll show you the newly-framed structure, and the finished shape will begin to emerge! My client is making some big final decisions as we speak, notably whether to go with a bronze metal roof or stay with standard shingles. You’ll be seeing the results of all the big decisions soon, and I can hardly wait to share! So just for fun, here’s a sneak peek at one of the great design elements coming to this house….

The Front Door

Have a great week, stay cool in this July heat, and come back next time for fun updates!

Posted in 50's House in the Woods, Remodeling Projects

50’s House in the Woods ~ Big Changes!

We’ve had some exciting things going on over at the 50’s House in the Woods project! We had a pause while trying to find just the right contractors for the foundation and framing, and for a very good reason! After doing the demo on the inside, even including removing the ceilings so the electricians could rewire…

NO ceilings!

… we realized the “attic” pitch was a mere 14″ at the HIGHEST POINT! We knew there was little to no attic, but come on! 14″! This was hard decision time in the project; and yes, the decision WAS made to raise the roof….literally! Here’s the outside of the house as it is now:

Loooooow roof pitch!

Tomorrow morning our Demo crew will be back to do a little more destruction before we start putting the house back together; they are going to tear off the roof AND the roof framing! This is a first for this remodeler – and it was not easy finding good crews to work with this situation. We have to be perfectly coordinated with one crew to remove everything and another crew to frame it back and get the new roof in the dry, because the house interior will be fully exposed in the meantime. We also have to coordinate getting the framing materials delivered at the right moment, but not so early they’ll be in the way of the dump trailer as it gets filled a few times. This task has a few “moving parts”, and they ALL have to work together perfectly I checked the weather for this period of time to make sure rain wasn’t forecast (what was I thinking?? Texas in July?!) So far, all we have ahead are 100++ days this week; while that is good for the no-rain outlook, the poor guys doing this job are going to be HOT! We are setting up fans to try to ease things a bit, but these guys will be heroes for working under these difficult and unusual conditions, to say the least.

So now you’re up on the “raising the roof” part of this upcoming week, but I’m so excited that they’ll ALSO be framing the 700 sq ft addition as well! To help you visualize the addition, let me show off our new foundation:

As you can see, this is a new pier and beam foundation done to match the existing one; with pier and beam one has the advantage of getting under the house to move plumbing or do repairs, which is WHY we’re able to do such fun changes to this house in the first place! However, finding a concrete contractor around East Texas who is experienced in this type of work was not easy: I would highly recommend Orta Construction – they did a fantastic job! It was so interesting watching the process, so I thought I’d share a few pictures of them drilling the piers and setting the forms.

Watch this video of digging a pier – I love the end!

Digging a pier

  • The demo crew is lined up starting tomorrow
  • The dump trailer will be here ready to cart off the old roof and timbers
  • The construction materials are being delivered Wednesday
  • The framing crew is ready to start Thursday
  • We will have the structure taking shape in a few days!

I’m going to share a small view of the plans, though you likely won’t see much due to the size; just notice the straight line of the original back of the house, then the addition of a bed/bath wing and a sunroom/music room. Now you see where we’re going with this! Next time I’ll fill you in on some style details of this MCM-ish house in the woods!

New addition on the back of the existing house

Thanks for joining us for this big project in the works – I can promise you the end will be astoundingly cool! Fortunately, my client believes in quality, so there is no skimping on this project (really, there seldom is!). Until next time, I hope you have a wonderful week and make absolutely the best of it! If you’re on vacation, I’m envious; if you’re not, I commiserate – stay cool if you can!

Posted in Design Tips Included!, Empty Nester's Full Home Refresh, Interior Design Interest

What Makes a House Beautiful?

There is no simple explanation of ‘what makes a house beautiful’….I have been in many homes, considering my interior design and real estate careers combined, but I will say there is no one thing, no formula, and no exact recipe for creating a beautiful home.

I have been in homes that felt beautiful, yet were out of date technically: I have been in homes that were fully up-to-date, with all the “right” finishes, yet seemed somehow lacking. Naturally, the warmth and personality of the home’s owners imbues the intangible magic ingredient to a beautiful home, but I can give you a few ideas of the elements that always combine to create beauty – and anyone, on any budget, can make this happen!

Throughout the rest of this series, which features my project I’ve named “Empty Nester’s Home Refresh”, I will try to point out the elements and how we’re using them in this home. Let me first say that my client’s home was beautiful before we even started! They had created a lovely atmosphere their family had enjoyed over the years; the home itself had/has “great bones”! It featured absolutely gorgeous picture-frame paneling in the living room, a wood ceiling with stained glass insert over the pool table, nicely proportioned rooms, and a yard and pool anyone would want!

All that said, my clients were ready to refresh and update the look, and in the case of the kitchen and master bath, the utility of the spaces. They expressed a desire to have the home feel ‘light and airy’, gearing off a color palette of teal and coral. So many decisions were made instantly by those simple requests!

Here are a few of the ways to create a feeling of “light” in your interior spaces:

  • Light reflective surfaces (more on that as we go)
  • Light, semi gloss mouldings and trim
  • Contrast! (This one may surprise you)
  • A combination of proper lighting, placed correctly
  • Balance of colors/textures
  • Light colors, but NOT all white (remember contrast?)

Now for the “airy” part – this is more intangible, but comes from the careful use of design elements such as balance, use of texture and simplicity. A hint of how:

  • Simple, clean lines in furnishings
  • Open spaces, wide, well-lit walkways
  • Keeping “visual weight” low (darker floors, lighter walls for example)
  • Large windows with minimal treatments

Now, this feels a bit to me like an oversimplification, as good design has so many more elements to keep in mind…one of the most overlooked being acoustics! For example, if you take away carpet in favor of a wood floor and also have large windows, you’re going to have sound bouncing around the 6 sides of the room! (floor and ceiling count). That’s where you start layering to create balance (a rug, fabric side drapery panels, upholstered furniture etc). But enough of “design class”, you want to see colors, right?! Let me share:

Color Palette in paint

Color chips can be distorted online, but this shows the relationship of colors being used in the house: Sherwin Williams’ Sea Salt is a very pale blue-gray color that sets the tone for my client’s accent colors of teal and coral. Sea salt is ACTUALLY a green, but goes up looking more blue. An actual shade of blue goes on the wall looking much too bright, and overtakes the room in most cases. I’ve found this is one of my “chameleon” colors, meaning it takes on it’s surroundings as a perfect backdrop. Wall colors throughout the house will be Sea Salt, Alabaster and Cedar Key, with Pure White mouldings throughout. Two small rooms will be Rainwashed, a slightly more intense pale aqua.

Clearly the colors themselves are light, but the FEELING of lightness will come from the contrast with semi-gloss white trim. Contrast creates light, even if you use a dark wall color (in the right circumstances!) Where this home has featured many wood surfaces, most will now be white, with selected wood areas such as kitchen beams, pool room ceiling and two sets of doors plus the entry doors being left stained. To keep this overall look from being TOO light, we balance it with a medium-tone hickory wood floor (texture and balance). Then we tone further with layers of texture and pattern, sometimes from rugs, sometimes a patterned tile floor…here is one example showing toning:

Color Palette with toning, texture & pattern
Layering with linen drapery panels

These are just a few clues from the plans for this home refresh, but to create a beautiful space, just remember to use balance in all things: balance of colors, textures, light, and acoustics. Example of a balance of textures might include a room that makes use of wood, fabric, metal, glass and pattern. You can easily add balance sometimes by the simple addition of textured/colored throw pillows, for example. If you’re going to paint a room, think about where the visual weight is, or needs to be: if the floor is light, consider a medium tone on the walls, with light trim. If the floor is darker, lighten up the walls. If you’re working with stained wood trim in the home, the walls will probably need to be a shade of white, and you’ll need visual weight (color and texture) on the floor. I hope this brief lesson in balance starts you looking around and thinking! Whether you want a weekend refresh or a full redo, just keep the basic elements in mind and you’ll be happy with the results!

Now, before I let you go, here are a few updates on the progress at the Empty Nester’s Refresh: new walls in the kitchen and bath have been sheetrocked and taped/bedded/textured to prepare for finishing. After a few modifications (they left phone jacks??) tomorrow, the painting phase begins. We will use primer and oil-based enamel on all wood in the house, and flat latex on all walls and ceilings. A quick note about flat vs satin or semi-gloss: the house’s walls and ceilings are textured in crow’s foot texture. Using a paint with sheen creates tiny shadows everywhere, as it calls attention to all the lines in the texture. The use of quality flat paint lets the walls become the backdrop for the clean lines of the furniture and adds a light & airy feeling to the house.

The new closets and cased openings have been trimmed out, also ready for caulk and paint. We cannot put down new base moulding until finished floors are installed, so that comes later. The custom cabinetry is ready, but since it will be installed finished already, we need to get pretty far long in the painting before installing the cabinets.

Tile installation will begin in another week, to include 2 showers, all bath and back hall floors, and the kitchen backsplash. It’ll be fun to share those finishing details, when it all starts to look beautiful again, but for now just know it’s coming! We are finally through the messy construction phase of this project and embarking on the much-more-satisfying finishing phase! Thanks for following the progress – I hope you have read at least one thing that helps you improve your own home spaces!

If you need a bit of help, you might consider a consultation; I am truly passionate about helping others live their best lives through environment!